IntelliJIdea for Android Mobile Development
I have been using JetBrains IntelliJIdea to write my Android mobile code. I've been using Resharper for my Visual Studio (ASP.Net / MVC) projects and I wholeheartedly recommend the tool. Imagine my geeky excitement when I saw that my favorite VS enhancement had an Android IDE!!
Nothing against Eclipse - I love Eclipse and have used it for my Java development for years now.
I recommend that you start here to begin using IntelliJIdea as your Android IDE. The link takes you to a page that describes how to set up Idea and write your first Android app. Prerequisites are:
- JDK is available on your machine.
- Android SDK is installed on your machine.
- Download PhoneGap. I'm using version 1.8.1. You might need to make slight adjustments for subsequent versions.
PhoneGap With IntelliJIdea
PhoneGap is a tool that allows developers to write their mobile apps using open standards - HTML5, CSS, JavaScript. Without PhoneGap, we can use expensive tools like MonoTouch ($999.00 per platform). My company uses MonoTouch and it really helps to alleviate the largest problem with cross platform mobile development - finding people that know ObjectiveC and Java.PhoneGap takes a different approach - write your client code in HTML5, using open source tools like jQuery Mobile to create rich UIs. These HTML pages make AJAX calls to web services that deliver dynamic info.
These same pages can be deployed embedded in your iOS app, your Android app, or simply deployed as a mobile web app viewable in a device's browser.
There are plenty of places that show you how to build PhoneGap apps using Eclipse, but I haven't found any that describe the process for creating PhoneGap projects in IntelliJIdea. Until now! :-)
Begin by opening IntelliJIdea and selecting Create New Project. In the dialog box, select Create Project From Scratch.

I called my new project FirstPhoneGapApp. Select Android Module in the "Select Type" list.

I pretty much took the default settings for the rest of the screens. I did pick USB device rather than an emulator on the last screen. If you don't have a device to debug on, then an emulator should work fine.
Now you should have a project in the IDE. It should like something like this:
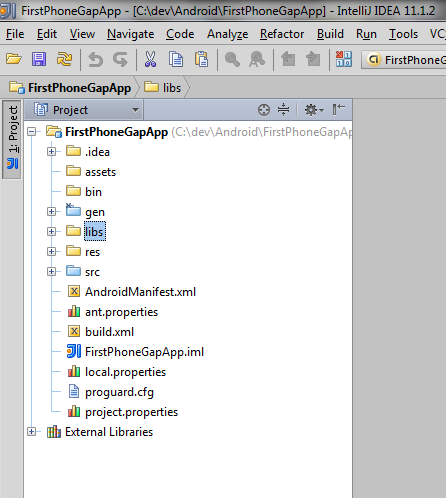
Right click on the libs folder and select "Show In Explorer" from the context menu. Copy your cordova-1.8.1.jar file into this folder.
Right click the assets folder and select "Show In Explorer" from the context menu. Create a new folder called "www". Copy your cordova-1.8.1.js file into this folder.
Your project should looks like this.

Right click on the Project Name (in this case FirstPhoneGapApp) and select "Open Module Settings". Pressing F4 will open the same dialog box. This is the Project Structure dialog.
Select Libraries and then click the little '+' icon near the top of the dialog. Select Java. Drill into the folder structure and select the cordoba.1.8.1.jar file that you added earlier. Click OK, then click OK again in the confirmation. You've added the cordoba jar file to your classpath.

Expand the Res folder, right click and add a new folder called 'xml'. Go to this link and download the plugins.xml file. Add this file to the xml folder you just created.
Open the AndroidManifest.xml file. Paste the following between the
<uses-sdk...>
<application...>
<supports-screens
    android:largeScreens="true"
    android:normalScreens="true"
    android:smallScreens="true"
    android:resizeable="true"
    android:anyDensity="true" />
<uses-permission android:name="android.permission.VIBRATE" />
<uses-permission android:name="android.permission.ACCESS_COARSE_LOCATION" />
<uses-permission android:name="android.permission.ACCESS_FINE_LOCATION" />
<uses-permission android:name="android.permission.ACCESS_LOCATION_EXTRA_COMMANDS" />
<uses-permission android:name="android.permission.READ_PHONE_STATE" />
<uses-permission android:name="android.permission.INTERNET" />
<uses-permission android:name="android.permission.RECEIVE_SMS" />
<uses-permission android:name="android.permission.RECORD_AUDIO" />
<uses-permission android:name="android.permission.MODIFY_AUDIO_SETTINGS" />
<uses-permission android:name="android.permission.READ_CONTACTS" />
<uses-permission android:name="android.permission.WRITE_CONTACTS" />
<uses-permission android:name="android.permission.WRITE_EXTERNAL_STORAGE" />
<uses-permission android:name="android.permission.ACCESS_NETWORK_STATE" />
<uses-permission android:name="android.permission.GET_ACCOUNTS" />
<uses-permission android:name="android.permission.BROADCAST_STICKY" />
Now open the src folder and the package name. If you chose the default file name when creating your
project, then your file name is MyActivity. Open it in the editor.
At the top, enter the following line with the other import statements: import org.apache.cordova.*;
Change the class declaration to look like the following:
 public class HistoricMarkers extends DroidGap
 {
   /** Called when the activity is first created. */
   @Override
   public void onCreate(Bundle savedInstanceState)
   {
     super.onCreate(savedInstanceState);
     //setContentView(R.layout.main);
     super.loadUrl("file:///android_asset/www/index.html");
   }
 }
OK - 1 more step. Let's create the HTML file.
 <!DOCTYPE HTML PUBLIC "-//W3C//DTD HTML 4.01 Transitional//EN"
     "http://www.w3.org/TR/html4/loose.dtd">
 <html>
 <head>
   <script type="text/javascript" charset="utf-8" src="cordova-1.8.1.js"></script>
   <title></title>
 </head>
 <body>
 <h2>Hello, Rich Buff!!</h2>
 </body>
 </html>
Because of my insatiable narcissism, I am compelled to see the message "Hello, Rich Buff" rather than the more ubiquitous "Hello, World". You can create whatever message your heart desires. :-)
Now you are ready! (I hope). Connect your device or activate your AVD and click the Run icon.
If the stars aligned (and these instructions are clear and accurate), you should see something like the following.

Congratulations! You've written your first mobile app using PhoneGap!
In a future blog post, I'll talk about making your app more dynamic with AJAX.
Have fun!!
