Tuesday, July 24, 2012

Cross Domain AJAX Calls with PhoneGap and jQuery

When creating a PhoneGap app, you are essentially creating a web page and it lives in the 'localhost' domain. Unfortunately, by default AJAX calls are only supported in the same domain - unless you use JSONP (JSON with padding). You can read more about JSONP here: http://en.wikipedia.org/wiki/JSONP

Create the Mobile Web Page

Ok, let's cheat... well, is saving time cheating?  I went to http://jquerymobile.com/ and used the prototyping tool and built a quick HTML5 page.
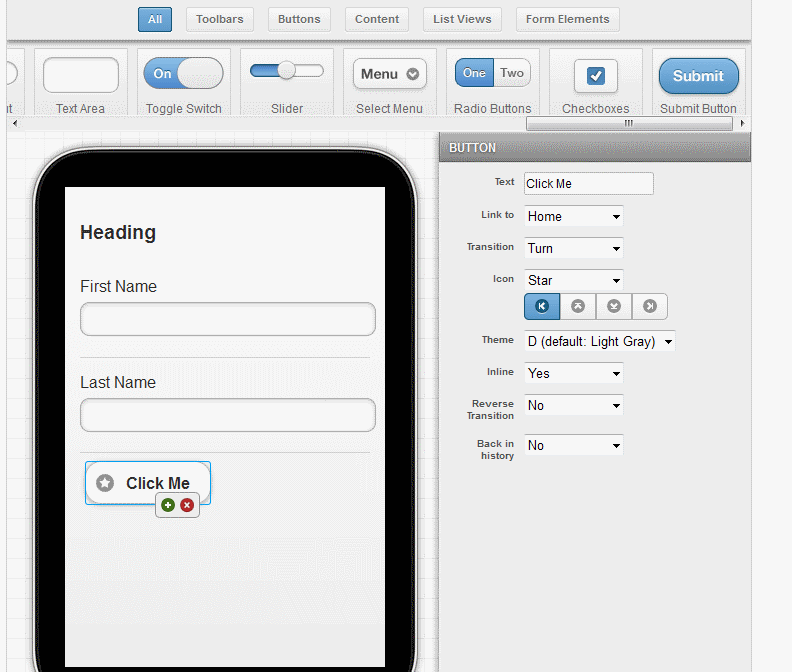


When I was finished, I clicked the "Download HTML" button and was given a neat little zip file with a web page, a CSS file and a JS file. I renamed the CSS and JS files to demo.* and copied them into my PhoneGap www\include folder.

I dropped the HTML page into the www folder and opened it in the editor.  I modified the HTML file to reference the newly added CSS and JS. I renamed the HTML file to ajaxdemo.html.  I also had to update the main java file of the PhoneGap app.

public void onCreate(Bundle savedInstanceState)  
   {  
     super.onCreate(savedInstanceState);  
     //setContentView(R.layout.main);  
     super.loadUrl("file:///android_asset/www/ajaxdemo.html");  
   }  

For a quick test, I viewed the HTML file in a browser to make sure it looks OK.  I could, at this point, compile and run the app in my phone.

Add a PHP Page to Call With AJAX

This is a very simple PHP page.  All we want to do is take some parameters from the Request and return a JSON object wrapped in a JSONP function.  You'll see what I mean when you read the code. I call this name.php.

firstname = $_GET['first'];  
 $theName->lastname = $_GET['last'];
  
 echo $_GET['callback'] .'('. json_encode($theName) . ')';  
 ?>  

The first lines simply grab the request values from the GET collection and assign it to a dynamically created object. PHP is like JavaScript in that you can create an object's members on the fly.

The JSONP part of this return is the
echo $_GET['callback'] .'('. json_encode($theName) . ')'
part.  When we create the actual AJAX request, we will declare a function in which to wrap our JSON response. This is part of our GET request. You'll see more when we build the AJAX request.

The PHP function json_encode()  is handy for taking your object or collection and turning it into a JSON object. You can find more info here.

I uploaded this file to my hosting account, so I can call it from my local code. After uploading, I can simulate the AJAX call with the following URL:
http://mysite.com/name.php?callback=jp&first=pat&last=buff

If you've copied my code correctly, you should see results that look like:
jp({"firstname":"pat","lastname":"buff"})

Now For AJAX and other JavaScript

The server-side code is in place.  Let's add the JavaScript.
    function appReady(){  
       $("#infodiv").html("Testing JSONP with jQuery");  
     }  
   
     $(document).ready(function(){  
       $("#get-name").click(function(){  
         handleClick();  
       });  
   
       $("#ajax_error").ajaxError(function(e, jqxhr, settings, exception) {  
         $(this).text( "Error requesting page " + settings.url);  
       });  
     });  
   
     document.addEventListener("deviceready", appReady, false);  
   
     $( document ).bind( "mobileinit", function() {  
       // Make your jQuery Mobile framework configuration changes here!  
       $("#infodiv").html('mobileinit worked');  
       $.mobile.allowCrossDomainPages = true;  
     });  
   
     function handleClick(){  
       var url = 'http://fineglasswork.com/histmarkers/client/partial.php';  
   
       $.ajax({  
         type: 'GET',  
         url: url,  
         contentType: "application/json",  
         dataType: 'jsonp',  
         data: {first: $("#firstname").val(), last: $("#lastname").val() },  
         crossDomain: true,  
         success: function(res) {  
           $("#resultsdiv").html("Hello, " + res.firstname + " " + res.lastname);  
           console.dir(res.fullname);  
         },  
         error: function(e) {  
           console.log(e.message);  
         },  
         complete: function(data) {  
           console.log(e.message);  
         }  
       });  
   
     }  

The guts of this script - the part we want to focus on - is the handleClick() function.  This is where we make our AJAX call with jQuery. We should pay special attention to these parameters:

         contentType: "application/json",  
         dataType: 'jsonp',  
         data: {first: $("#firstname").val(), last: $("#lastname").val() },  
         crossDomain: true,  

Declaring the dataType as 'jsonp' will automatically add the 'callback' parameter to the GET request. crossDomain is set to true (of course! otherwise we wouldn't need to use JSONP). The data is passed as a JSON object.  The data elements will automatically be added to the GET request for us - no need to build a URL with a querystring.

We are ready to run our code!  I usually use my HTC Evo, but in this case, I ran it with an emulator so I could get this beautiful screen shot.  I entered a first name and last into the Text fields and clicked the "Click Me" button to get this result.


Now isn't that just gorgeous!

Something you might notice is that the heading is different when you see the page in your browser.  That's because we modify that header in the appReady handler.  The appReady handler is defined in this line:
    document.addEventListener("deviceready", appReady, false);  
The deviceready event is used to notify the app that PhoneGap is loaded.  When writing PhoneGap apps, you should wait until deviceready event is called before depending on any PhoneGap functionality to be available.

That's it for now!  I hope this was helpful.  Please feel free to ask questions or suggest changes.

Edit: I've uploaded the code in this Post to GitHub. https://github.com/RichBuff/PhoneGap-App-with-JSONP-AJAX-Call


You can also find this article on my new blog site: http://alpheussoftware.com/?p=20


Sunday, July 1, 2012

Create Your First Android PhoneGap App With IntelliJIDEA

IntelliJIdea for Android Mobile Development


I have been using JetBrains IntelliJIdea to write my Android mobile code.  I've been using Resharper for my Visual Studio (ASP.Net / MVC) projects and I wholeheartedly recommend the tool.  Imagine my geeky excitement when I saw that my favorite VS enhancement had an Android IDE!!

Nothing against Eclipse - I love Eclipse and have used it for my Java development for years now.

I recommend that you start here to begin using IntelliJIdea as your Android IDE. The link takes you to a page that describes how to set up Idea and write your first Android app. Prerequisites are:
  • JDK is available on your machine.
  • Android SDK is installed on your machine. 
  • Download PhoneGap. I'm using version 1.8.1. You might need to make slight adjustments for subsequent versions.

PhoneGap With IntelliJIdea

PhoneGap is a tool that allows developers to write their mobile apps using open standards - HTML5, CSS, JavaScript. Without PhoneGap, we can use expensive tools like MonoTouch ($999.00 per platform). My company uses MonoTouch and it really helps to alleviate the largest problem with cross platform mobile development - finding people that know ObjectiveC and Java.

PhoneGap takes a different approach - write your client code in HTML5, using open source tools like jQuery Mobile to create rich UIs. These HTML pages make AJAX calls to web services that deliver dynamic info.

These same pages can be deployed embedded in your iOS app, your Android app, or simply deployed as a mobile web app viewable in a device's browser.

There are plenty of places that show you how to build PhoneGap apps using Eclipse, but I haven't found any that describe the process for creating PhoneGap projects in IntelliJIdea.  Until now!  :-)

Begin by opening IntelliJIdea and selecting Create New Project. In the dialog box, select Create Project From Scratch.


I called my new project FirstPhoneGapApp.  Select Android Module in the "Select Type" list.


I pretty much took the default settings for the rest of the screens.  I did pick USB device rather than an emulator on the last screen.  If you don't have a device to debug on, then an emulator should work fine.

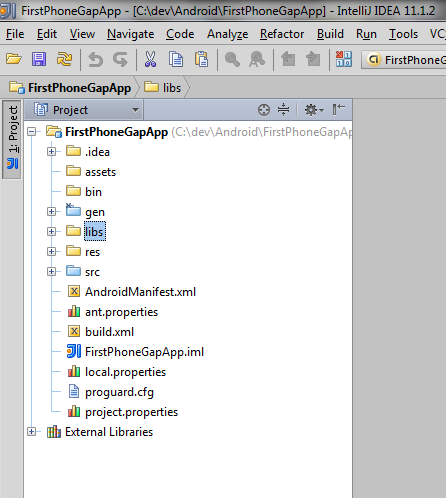
Now you should have a project in the IDE.  It should like something like this:


Right click on the libs folder and select "Show In Explorer" from the context menu.  Copy your cordova-1.8.1.jar file into this folder.

Right click the assets folder and select "Show In Explorer" from the context menu.  Create a new folder called "www".  Copy your cordova-1.8.1.js file into this folder.

Your project should looks like this. 


Right click on the Project Name (in this case FirstPhoneGapApp) and select "Open Module Settings". Pressing F4 will open the same dialog box. This is the Project Structure dialog.

Select Libraries and then click the little '+' icon near the top of the dialog. Select Java.  Drill into the folder structure and select the cordoba.1.8.1.jar file that you added earlier. Click OK, then click OK again in the confirmation. You've added the cordoba jar file to your classpath.


Expand the Res folder, right click and add a new folder called 'xml'.  Go to this link and download the plugins.xml file.  Add this file to the xml folder you just created.

Open the AndroidManifest.xml file.  Paste the following between the
 <uses-sdk...>  
and the
 <application...>  
tags.

<supports-screens 
    android:largeScreens="true" 
    android:normalScreens="true" 
    android:smallScreens="true" 
    android:resizeable="true" 
    android:anyDensity="true" />
<uses-permission android:name="android.permission.VIBRATE" />
<uses-permission android:name="android.permission.ACCESS_COARSE_LOCATION" />
<uses-permission android:name="android.permission.ACCESS_FINE_LOCATION" />
<uses-permission android:name="android.permission.ACCESS_LOCATION_EXTRA_COMMANDS" />
<uses-permission android:name="android.permission.READ_PHONE_STATE" />
<uses-permission android:name="android.permission.INTERNET" />
<uses-permission android:name="android.permission.RECEIVE_SMS" />
<uses-permission android:name="android.permission.RECORD_AUDIO" />
<uses-permission android:name="android.permission.MODIFY_AUDIO_SETTINGS" />
<uses-permission android:name="android.permission.READ_CONTACTS" />
<uses-permission android:name="android.permission.WRITE_CONTACTS" />
<uses-permission android:name="android.permission.WRITE_EXTERNAL_STORAGE" />
<uses-permission android:name="android.permission.ACCESS_NETWORK_STATE" /> 
<uses-permission android:name="android.permission.GET_ACCOUNTS" />
<uses-permission android:name="android.permission.BROADCAST_STICKY" />

Now open the src folder and the package name.  If you chose the default file name when creating your
project, then your file name is MyActivity. Open it in the editor.

At the top, enter the following line with the other import statements: import org.apache.cordova.*;

Change the class declaration to look like the following:

 public class HistoricMarkers extends DroidGap  
 {  
   /** Called when the activity is first created. */  
   @Override  
   public void onCreate(Bundle savedInstanceState)  
   {  
     super.onCreate(savedInstanceState);  
     //setContentView(R.layout.main);  
     super.loadUrl("file:///android_asset/www/index.html");  
   }  
 }  

OK - 1 more step.  Let's create the HTML file.

 <!DOCTYPE HTML PUBLIC "-//W3C//DTD HTML 4.01 Transitional//EN"  
     "http://www.w3.org/TR/html4/loose.dtd">  
 <html>  
 <head>  
   <script type="text/javascript" charset="utf-8" src="cordova-1.8.1.js"></script>  
   <title></title>  
 </head>  
 <body>  
 <h2>Hello, Rich Buff!!</h2>  
 </body>  
 </html>  

Because of my insatiable narcissism, I am compelled to see the message "Hello, Rich Buff" rather than the more ubiquitous "Hello, World".  You can create whatever message your heart desires.  :-)

Now you are ready! (I hope).  Connect your device or activate your AVD and click the Run icon. 

If the stars aligned (and these instructions are clear and accurate), you should see something like the following.


Congratulations! You've written your first mobile app using PhoneGap!

In a future blog post, I'll talk about making your app more dynamic with AJAX.

Have fun!!


Wednesday, June 20, 2012

It's Been A While

I knew it had been a few months since my last post.  As it turns out, it's been almost a year!  Ugh.  I've been working on some very cool MVC projects, learning HTML5, and dabbling in mobile development.  What have I NOT been doing?  Blogging about it!  Let's change that....

New Discovery 

The only 2 viable mobile platforms right now are Android and iOS. (OK - maybe Windows mobile, maybe).  Of course, what that means is to write an app for both platforms means writing an app in Java for 'Droid and porting it to ObjectiveC (or the other direction).

There are ways to avoid this - Monotouch lets you write your code in C# and compile to your target platform. Monotouch is not cheap - $1000 for each platform! Yikes!

I recently discovered another tool that allows people to write once and run everywhere - PhoneGap.

PhoneGap lets a developer create HTML5 pages, add them as the content to their phone app, compile and run.  Wow.

This has so many advantages:
1. We already know HTML and Javascript
2. Did I mention that PhoneGap is FREE?
3. Testing is a breeze now - in fact, you can write your HTML/Javascript code once, and test it in a mobile browser, desktop browser, and in your apps.

There are very clear directions on how to write an app using PhoneGap, so I won't bore you by re-writing a how-to.  I wrote a very simple app using jQuery Mobile and Google maps.

All this app does is get your current location and create a 'pin' in a Google map. 

Below is the HTML5 code I wrote.  Give it a shot!  :-)  I think PhoneGap is a great tool that really simplifies creating mobile apps.  By the way - I also took advantage of the jQuery Mobile layout tool to generate the HTML and CSS.  What it generates is pretty generic (for example, I had to completely rewrite the code that communicates with Google Maps), but it's a good starting point.


<title>  
     </title>  
     <link href="http://code.jquery.com/mobile/1.1.0/jquery.mobile-1.1.0.min.css" rel="stylesheet"></link>  
     <link href="my.css" rel="stylesheet"></link>  
     <style>  
       #mapcontainer {  
       height: 300px;  
       width: 95%;  
       border:3px solid #eaeaea;  
       }  
 </style>  
     <script src="http://ajax.googleapis.com/ajax/libs/jquery/1.7.1/jquery.min.js">  
 </script>  
     <script src="http://code.jquery.com/mobile/1.1.0/jquery.mobile-1.1.0.min.js">  
 </script>  
     <script src="http://www.google.com/jsapi">  
 </script>  
     <script src="http://maps.google.com/maps/api/js?sensor=false">  
 </script>  
     <script charset="utf-8" src="cordova-1.8.1.js" type="text/javascript">  
 </script>  
     <script src="https://ajax.googleapis.com/ajax/libs/jquery/1.7.2/jquery.min.js" type="text/javascript">  
 </script>  
     <script src="modernizr.js" type="text/javascript">  
 </script>  
     <script type="text/javascript">  
       $().ready(function(){  
         if ( Modernizr.geolocation ) {  
           navigator.geolocation.getCurrentPosition(  
           function(pos) {  
           $("#lat_field").val(pos.coords.latitude);  
           $("#long_field").val(pos.coords.longitude);  
           var coords = new google.maps.LatLng(pos.coords.latitude, pos.coords.longitude);  
           var mapOptions = {  
             //zoom level, between 0 to 21.  
             zoom: 15,  
             //center to the user location  
             center: coords,  
             //add map type controls.  
             mapTypeControl: true,  
             //navigation control options  
             navigationControlOptions: {  
               style: google.maps.NavigationControlStyle.SMALL  
             },  
             //default map type  
             mapTypeId: google.maps.MapTypeId.ROADMAP  
           };  
           // Create the map, and place it in the mapContainer div  
           map = new google.maps.Map(  
             document.getElementById("mapcontainer"), mapOptions  
           );  
           // Place the initial marker  
           var marker = new google.maps.Marker({  
             position: coords,  
             map: map,  
             title: "Your current location!"  
           });  
           }  
           );  
         }  
         else{  
           alert("Error");  
         }  
       });  
 </script>  
     <div data-role="page" id="page1">  
 <div data-role="header" data-theme="a">  
 <h3>  
           Where Am I  
 </h3>  
 </div>  
 <div data-role="content" id="mapcontainer" style="padding: 15px;">  
 </div>  
 </div>  


Thursday, August 11, 2011

Little Gotcha in VS 2010

If you have a class library, and you want to write a Console app to test your class lib with, you might find you get a compile error that doesn't make sense:

The type or namespace name 'MyClassLib' could not be found (are you missing a using directive or an assembly reference?) 

This could be caused by the target framework being set to "client"

Here's how to fix it:
  1. Right click the console app project, and select Properties (at the bottom of the menu).
  2. Select the Application tab on the Property page
  3. Check the Target Framework - make sure it is NOT .Net Framework 4.0 (or 3.5, if that's what you are using).
  4. If it is client, you can just select the correct framework - in my case .Net Framework 4.0
  5. When you select the new Framework, you will get a warning about unloading the project.  Who cares, it's wrong anyway!  :-)

Monday, August 8, 2011

How To Tell If a Request Is An AJAX Request (Microsoft MVC)

There might be times when you want to handle an AJAX http request differently than a "normal" http request.

It's really quite simple - just check the request header!

if (Request.Headers["X-Requested-With"] != null
    && Request.Headers["X-Requested-With"] == "XMLHttpRequest"){
   // if here this is an AJAX Request
}


The point is, take a look at the Headers attribute of the Request and check using the code above.

Hope this post saves someone some time!

Tuesday, August 2, 2011

APIs and Method Deprecation

One of my current projects requires the use of a Library for document conversion and manipulation.  This company has some very good products and they are in a complicated space - one that's always changing.  Like most library vendors, they are looking for ways to improve their offering.  With improvements, comes change...

That said, they are not very experienced at .Net.  Most of their libraries are unmanaged DLLs and their support for .Net clients is with a managed DLL that is a thin adapter around the unmanaged DLL.

Consider this call:  lib.DoSomething(string FileName, int Param);
In earlier versions of their libraries, I would pass in a file name and the param and all was good in the world.

In the newest version, the signature has not changed, but you are not supposed to pass in a file name!  You should only pass "" (an empty string).

In other words, the only valid way to call this method is
 lib.DoSomething("", myInt); 

To add insult to injury, this silently changed between versions!  

There are a lot of things wrong with this approach:
  1. They are causing runtime errors for anyone who doesn't change their code
  2. No one would think about changing their code unless they just happened to catch the change on page 43 of their doc. (and we *all* read the doc, right?) :-)
  3. The method signature doesn't really match the intent.  (Why should I have to pass a parameter when only one value is ever valid - especially when it's a null value?) 
For all intents and purposes, they really want to deprecate this method, but they were not quite sure how to go about it.

What is the right way to deprecate a method in an API in .Net?

You should not kill a method right away.  Give your customers time to change their code to match your changes.  Honestly, if you can avoid deprecation, you should.  In the cases where it is unavoidable, you should use this pattern.

First, mark your deprecated method with the [obsolete] attribute.
[Obsolete("This method is obsolete; use method DoSomething2 instead. This method will become unsupported in version x.y")]
public void DoSomething(string Filename, int Param)


Create the replacing method - it should have a different signature.
public void DoSomething2(int Param)

With this pattern, there is no chance that your changes will cause a runtime error!  Instead, your customers will see compiler-time errors/warnings which is definitely preferable.